Singscope Music Functions User Guide

1. Activate the Feature Pack

The Music Festures described in this user guide are part of Sheet Music Support Pack for Singscope. It is availble as an In-App Purchase item in Singscope. Before purchasing the item, you can activate the free trial to enable the feature pack for a limited time.

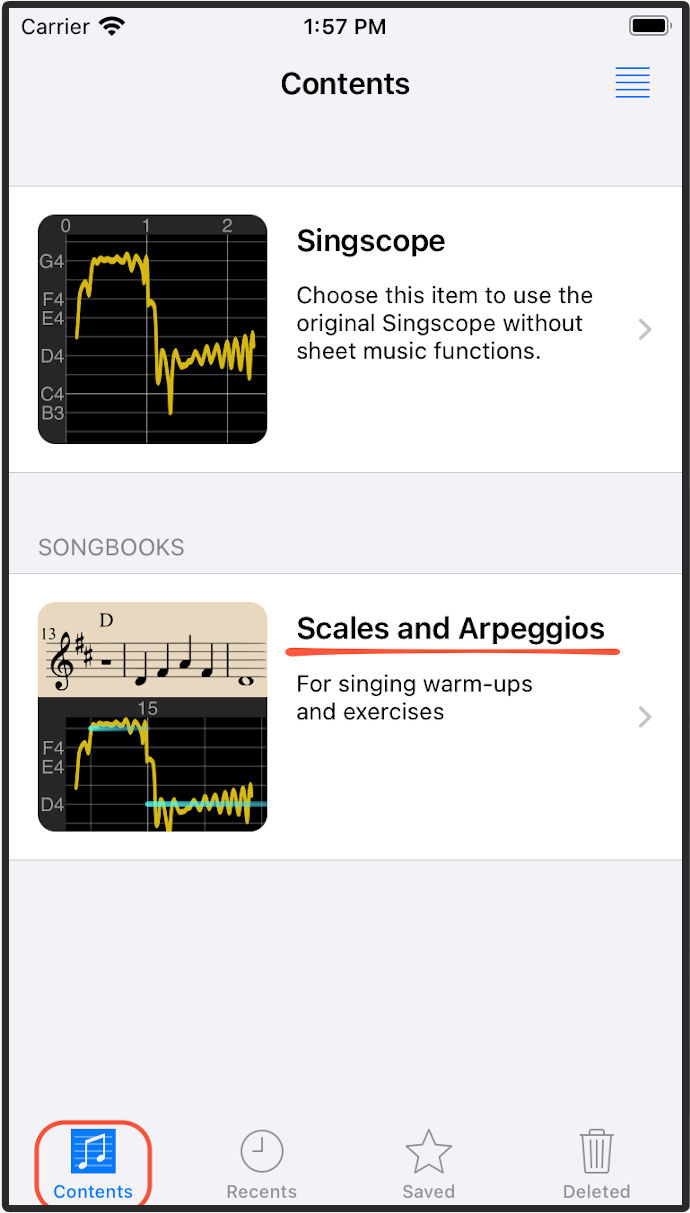
After you purchase the item or activate the free trial, in the Contents tab, tap the second item Scales and Arpeggios to open it.

* The free trial will be expired after 7 days. After expiration, all the voice recordings you created during this period will still be available and can be accessed using the original Singscope wihtout music functions.

Contents - Music

2. Open a Music

The Scales and Arpeggios folder contains a list of sheet music for singing warm-ups and exercises purposes. Tap on an item to open it in the Scope.

When scope is opened for the first time, it shows the help screen. Tap on each tool to show a brief description of the tool. Or simply tap on the Next bottom and dismiss the help screen.

* If you'd like to see the help screen again, tap the Menu button on the top left corner, and select Help menu item.

Singscope Help

On the scope page, there are three parts. From top to bottom, each part shows the folowing content respectively: the Sheet Music, the Waveform of your singing voice, and the Pitch Graph.

On pitch graph, the horizental axis represents time in units of beat defined on the sheet music. The vertical axis represents pitch in units of semitone. For each musical note described on the sheet music, its pitch and time postion is highlighted on the graph. Those highlight marks can be used as a reference when singing.

*1. On the horizental axis, each thick vertical grid line corrosponds to a bar line on the sheet music, and the labeled number is the measure number. Each thin vertical grid line represents the start time of a beat.

*2. The labels on the vertical axis include music names and octave numbers. For example, C4 means note C at 4th octave, which is corresponding to the middle C in piano keyboard. A4 is note A at 4th octave and has an exact pitch frequency of 440 Hz.

Singscope with music

You can switch the music-note-name labels shown on the left- and right-hand-side of pitch graph. The labels on either side can be set separately. Simply tap and hold the music-note-name-label area on either side to invoke the popup menu.

*3. Among the six supported music note names shown above, the last four are Movable-Do type, where the key note is determined from the key signature in the sheet music.

*4. On a 4 inch or smaller screen, the sheet music and the waveform won't show at the same time. The show or hide of these two windows can be set by the popup menu from the Menu button, located on top-left corner of the screen.

Note Name Label

3. Start Your Singing

When Singscope records and analyzes your singing voice, it can play the notes and chords prescribed by the sheet music at the same time. If you'd like know how it plays and get an idea of the melody of the music, you can tap Play button and listen.

To avoid playback of this instrument sound being picked up by the microphone and interfere the analysis of your singing voice, please use wired earphones or headphones whenever possible. If your device is an iPhone, you can also use its Receiver (the earpiece when you use your iPhone as a handset during a phone call).

If you are ready, tap the Microphone button and start your singing.

*1. The support of Bluetooth devices is not ready yet due to their high audio latency. It will be ready in the future update.

*2. Singscope needs access to the microphone. Please make sure the Microphone is enabled for Singscope in the device's Settings > Privacy > Microphone.

*3. Singscope is sensitive to ambient noise, so it performs better when you sing in a quiet place. If you'd still like to use Speaker for instrument sound playback, please turn down the volume to be as small as possible.

Microphone Help

When you are done with your singing, tap on the Microphone button again to pause recording.

Tap the Rewind button to go to the beginning.

Tap the Play button to hear your singing playback.

Browse your singing pitch graph by pan-and-zoom using typical touch gestures such as drag and pinch. In the graph, you can compare your pitch curve with the highlighted musical note positions.

For some singing voices (for example, typical male voices), the real pitch may be an octave lower then the highlighted position. If this is the case, the note highlighting can be adjusted by the settings in the Music Tools menu (see Section 5).

Music Curve Play

There are three buttons on the right hand side of bottom toolbar:
Mixer is described in Section 4.
Music Tools is described in Section 5.
Here we describe the function of Graphic Settings first.

Music Settings Help

The Graphic Window Auto Panning option, when set to locked, is for locking the pitch graph window and prevent it from panning automatically in vertical direction during singing voice recording or playback.

The Graph Contrast slider is for adjusting the pitch curve brightness. Note that brightness of the dots in a pitch curve is directly related to the singing volume. Move the slider to the right can boost the brightness of the curve, especially for the portion where singing volume is lower.

Adjust Contrast

4. Mixer Panel

The mixer panel contains three sections: Input, Mixer, and Output.

The Input section shows the active microphone used by the app. If the microphone device supports manual gain adjustment, the Input Gain Slider can be used for adjusting the sensitivity of microphone. The slider may not be available for devices that utilize automatic gain control.

The Mixer section includes three channels:

Melody channel is for instrument playback according to the music notes described on the sheet music.

Chord channel is for instrument playback according to the chord symbols marked on the sheet music. For vocal exercise purpose, we play chord notes in a pattern just to give you a cue for the tones and beats that you are about to practice.

Vocal channel is for playback of your singing voice recording.

The Output section shows the active playback device used by the app. For iPhone, there is a switch in this section for selecting playback output channel, either to Speaker, or to Receiver (the earpiece when you use iPhone as a handset during a phone call).

*1. The settings for all three channels are applied when the Play function is active. When the Microphone function is active and picking up your singing voice, the instrument sound is playback at the same time, and the settings of Melody and Chord channels are applied for this instrument sound playback.

*2. When you are singing and recording with Microphone function without using earphones or headphones, it is recommeded to use Receiver to avoid playback of instrument sound being picked up by the microphone and interfere the analysis of your singing voice. If you'd still like to use the Speaker for playback, please turn down the volume to be as small as possible.

Mixer
Mixer-Headphones

Bluetooth headsets, including AirPods, are supported for iOS 10 and later. The connected Bluetooth headset will be used for audio playback only. Due to the limitation of audio sample rate of Bluetooth microphones, the app will still use iPhone/iPad built-in microphone to pick up your voice even if the Bluetooth headset is connected.

The Bluetooth audio delay could cause vocal and instruments channels to be out of sync. In the app, we include extra code to compensate this latency and make them in sync again. The default latency time is derived from the related information provided by the operating system. Depending on the manufactures and models, this information may not be accurate for all of Bluetooth headsets. To view and adjust the compensating latency time used in the app, tap the bluetooth button on the right hand side of the Bluetooth device name in the output section.

Mixer-Bluetooth

Different Bluetooth headset brand and model may have different latency time. If you use a Bluetooth headset and notice a signifcant sync issue, you can improve the condition by adjusting this "Latency" setting.

*3. It could be tricky to find out a good latency time setting. If you know the exact location of the active microphone on your iPhone or iPad, you can do the calibration by following steps: (1) connect the Bluethooth headset and open a sheet music; (2) put one Bluetooth headphone to be as close to the microphone hole as possible; (3) start the recording and make sure the instrument sound played on the headphone can be picked up by the microphone; (4) record for a few seconds and then stop, rewind to the beginning of the recording; (5) check the start time of the first recorded sound, by dragging the window on the waveform to the location where audio singal starts. The exact time is shown on the status bar below the graph. The ideal start time should be between 0.07 to 0.09 second, which is tipical latency time when using built-in or corded microphone and speaker/headphones. Adjust the "Latency" in the "Bluetooth Device" setting such that, after compensating, the first recorded sound start time is around 0.08 second.

Bluetooth Latency

5. Music Tools

The Music Tools button is linked to a popup menu. The menu contains two sections.

The Adjust Notes Highlighting section includes three settings for positioning the pitch highlighting on the graph relative to the pitch described by musical notes on the sheet music. For some singing voices like typical male voices, the actual pitch frequency could be an octave lower then the pitch described by musical notes, and this difference can be compensated by setting to "Octave Lower". Sometimes you may want to try practicing an octave higher or lower, and again, this can be done by choosing a suitable setting.

The Music section includes 3 commands: Change Tempo, Change Key, and Select Passages.

Music Menu

Change Tempo is for adjusting the speed of singing. This can be done by modifying the value of Metronome Mark on the sheet music.

Change Tempo

Change key is for applying music transposition to the sheet music, and that shifts all notes upward or downward by a specified number of semitone steps.

Change Key

Select Passages is for selecting the passages that are appropriate for your singing range.

Select Passages

6. Sheet Music Page

Tap the Sheet Music button to maximize the sheet music window to fill most of the workspace.

Sheet Music Button

In this sheet music page view, you can pan-and-zoom the page using typical touch gestures such as drag and pinch. Most Singscope functions, including Microphone and Play, are still accessible in this view.

Sheet Music Page

7. Finish Singing

Tap the New button to clear pitch graph and start a new one.

Tap the Back button to go back to the music contents screen.

After either New or Back operation, the recorded voice in worksapce, if any, is kept in the Recents folder (see the next section).

* When you make a new recording, older recordings may be discarded to make space available for the new one. The limit of storage space for recent recordings can be set in Menu -> Settings -> Recording Storage Setting.

Back/New/Menu help screen

8. Review Recordings

On the first screen when you launch Singscope, besides the Contents tab that we mentioned eariler in this guide, there are 3 additional tabs: Recents, Saved, and Deleted. These tabs holds the previously recorded singing voices.

To switch to the Recents folder, simply tab the Recents tab icon. All newly recorded singing voices are kept in this folder temporarily. To review an item, just tap on it, and the item will be opened in the Singscope view, where you can see the graph and play the voice again.

Go back to the Recent folder. Here you can also save, share, rename , or delete an item. Simply slide the item leftward or rightward to reveal the operation buttoms. Saved recordings are kept in the Saved folder. Deleted recordings are moved to the Deleted folder.

* Older recordings in Deleted and Recents folders may be discarded to make space available for the new one when you make a new recording.

To share or export a recording item, slide the item rightward and then tap the Share button. Then, on the popup, you can choose AirDrop, Save to Files, or choose an App to share the recording file.

How to Share a Recording File

* The shared recording file is with file extension .singscope. It is actually a zip file that contains an audio file in CAF format. You can simply unzip the file to retrieve the CAF audio file. If your computer does not recognize the file as zip, you can rename the file extension to .zip.

Recentl help screen
Recents help screen

9. Additional Functions

This feature pack supports importing of a subset of MusicXML Lead Sheets files, so you can import your own lead sheets for singing exercises. For the information about the supported file type and how to use it, please refer to the following link:

Use Your Lead Sheets

We regularly update our app to add new functions, improve the usability, and fix problems. To learn more about additional functions, please refer to the following link:

What's New

Contact Us

Any comments, suggestions, inquiries, and bug reports, please email us at developer@singscope.com.

THIS SOFTWARE AND THE INFORMATION PROVIDED BY THIS WEB SITE ARE PROVIDED "AS IS". ANY EXPRESS OR IMPLIED WARRANTIES, INCLUDING, BUT NOT LIMITED TO, THE IMPLIED WARRANTIES OF FITNESS FOR A PARTICULAR PURPOSE, ARE DISCLAIMED. IN NO EVENT SHALL THE AUTHOR AND DEVELOPER, SPRINGWELL MUSIC LLC, BE LIABLE FOR ANY DIRECT, INDIRECT, INCIDENTAL, SPECIAL, EXEMPLARY, OR CONSEQUENTIAL DAMAGES (INCLUDING, BUT NOT LIMITED TO, PROCUREMENT OF SUBSTITUTE GOODS OR SERVICES; LOSS OF USE, DATA, OR PROFITS; OR BUSINESS INTERRUPTION) HOWEVER CAUSED AND ON ANY THEORY OF LIABILITY, WHETHER IN CONTRACT, STRICT LIABILITY, OR TORT (INCLUDING NEGLIGENCE OR OTHERWISE) ARISING IN ANY WAY OUT OF THE USE OF THIS SOFTWARE, EVEN IF ADVISED OF THE POSSIBILITY OF SUCH DAMAGE.